How to contribute to Glamorous Toolkit through a GitHub pull request
You have been using the ready made GT distribution for a while now, writing your own code, examples, views and actions, occasionally trying to extend or modify existing code. You have something that you would like to propose for addition to GT itself. Maybe you fixed a bug.
As GToolkit is being developed on GitHub, you will need to do a pull request. This is a standard and widely used way to contribute to open source software.
You need a GitHub account, with SSH keys, the command line git executable, SSH agent setup as well a a personal access token.
There are two ways to access remote GitHub repositories, via two different origin URLs. There are HTTPS URLs in the form of https://github.com/owner/project.git and SSH URLs in the form of git@github.com:owner/project.git, both are equivalent and refer to the same remote server.
You need a username and a personal access token as password in the first case and SSH keys for the second case.
To allow unattended access (i.e. to prevent any interactive prompts) you need a credentials helper in the first case and an SSH agent in the second case.
Make sure clone, pull, commit and push all work on the command line before continuing.
Let GtGitHubTokenHolder
know about your personal access token. You can set it directly as a string using GtGitHubTokenHolder>>#token:
, let it be read and copied from a file using GtGitHubTokenHolder>>#readAndCacheTokenFrom:
or let it be read each time from a file using GtGitHubTokenHolder>>#readTokenEachTimeFrom:
. In the last case the token is not stored in an object that is part of the image.
Let's use a simple example to make things more concrete. Though there already exists a preview inspector gt view for Color, you like circles way more and want to add such a view.
Color red
Here is the source code of such an addition.
You want to add this as Color>>#gtCircleFor:
Since this is an extension, you look at the other gt views on Color and you notice most of them belong to GToolkit-Inspector so you decide to do the same, i.e. set the method category to *GToolkit-Inspector. You test your extension and you are happy.
It is best to start with a fresh, clean, fully up to date, ready made distribution GT image from https://gtoolkit.com/download/ and to launch your image from the command line.
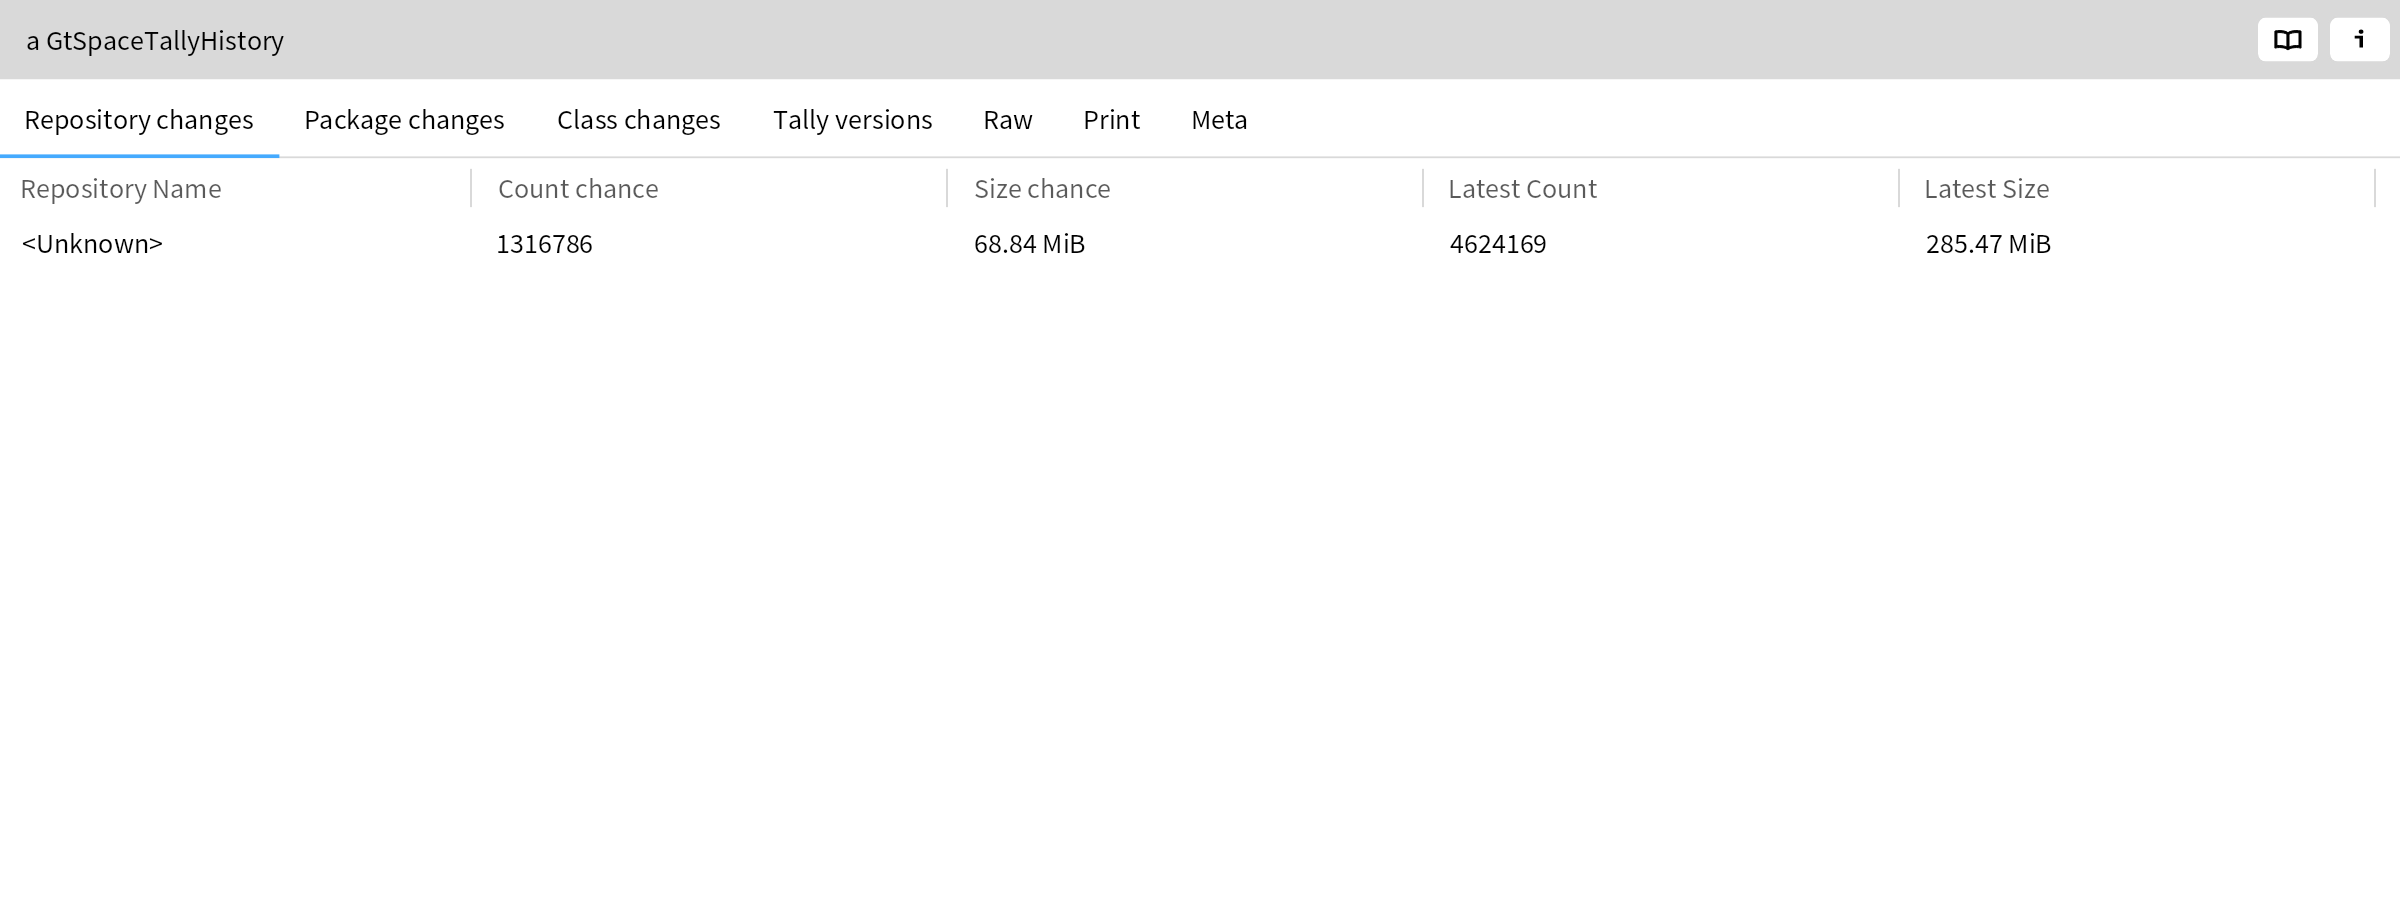
Since no repositories are defined we first need to find out which repository we need, since there are many of them. When the ready made image was created, some essential information about each repository was recorded. See the History inspector tab in IceRepository
. Note that the history is not present in a developer image built from sources.
We need to find which repository holds our package. This can be done using GtGitRepositoryRegistryHistory>>#repositoryIncludingPackage:
as follows.
GtGitRepositoryRegistryHistory instance repositoryIncludingPackage: 'GToolkit-Inspector'
Now that we know this, we have to restore the gtoolkit-inspector repository.
To do a pull request you need your personal fork of the repository you want to contribute to. You also need to make your changes in a feature branch.
Go to the History tab of IceRepository
, select gtoolkit-inspector and click the Fork button.
When you open the GT Git tool, you should now see this repository. It was forked, cloned, and then created and registered in GT.
The pull request process works by first committing to this copy or fork in your own GitHub account and then asking for those changes to be considered for inclusion.
Before committing our changes we also need to create a feature branch which is like a name indicating the intent of our changes. Here we name the new branch feature-color-gt-view-circle by toggling to the inspector view in the Git tool and going to the underlying repository.

When on the Branches inspector tab a + button appears that allows you to create and switch to a branch by specifying its name.
Our forked repository is now switched to our feature branch. We push this branch so that it appears in our forked repository on GitHub.
Now we are ready to add our code and make the actual change in our image (see the Example section above).
Going back to the GT Git tool, we can see our repository with our change ready to be committed on our branch. Go ahead and commit. The first line of the last commit on the branch will be used as comment for the pull request later on.
Next we need to push the changes in our fork so that our changes become visible in our forked repository on GitHub. Do a push.
Finally we can create the actual pull request, again using the repository inspector view.
If all went well, you can see your pull request appear in the master repository. The team behind GT will either accept your PR to integrate it, or will communicate with you to discuss further options.