Building treemaps
A treemap represents a tree. That means that before we can represent a treemap, we first need a tree.
Let's start with visualizing a directory containing files and other directories. To define the treemap, we start from a root directory and specify the structure should be navigated recursively through directories and the leaves of the tree are the files.
fileReferenceTreeMap
	<gtExample>
	<return: #GtNestedRectangleTreeMap>
	^ GtNestedRectangleTreeMap new
		roots: {self fileReference};
		leaves: [ :aNode | aNode files ];
		deep: [ :aNode | aNode directories ]

The above treemap represents all leaves using the same weight. We can also specify different sizes.
fileReferenceTreeMapWithLeavesSize
	<gtExample>
	<return: #GtNestedRectangleTreeMap>
	^ self fileReferenceTreeMap leavesSize: [ :aNode | aNode size max: 1000 ]

This is the basic mechanism.
Manufacturing trees
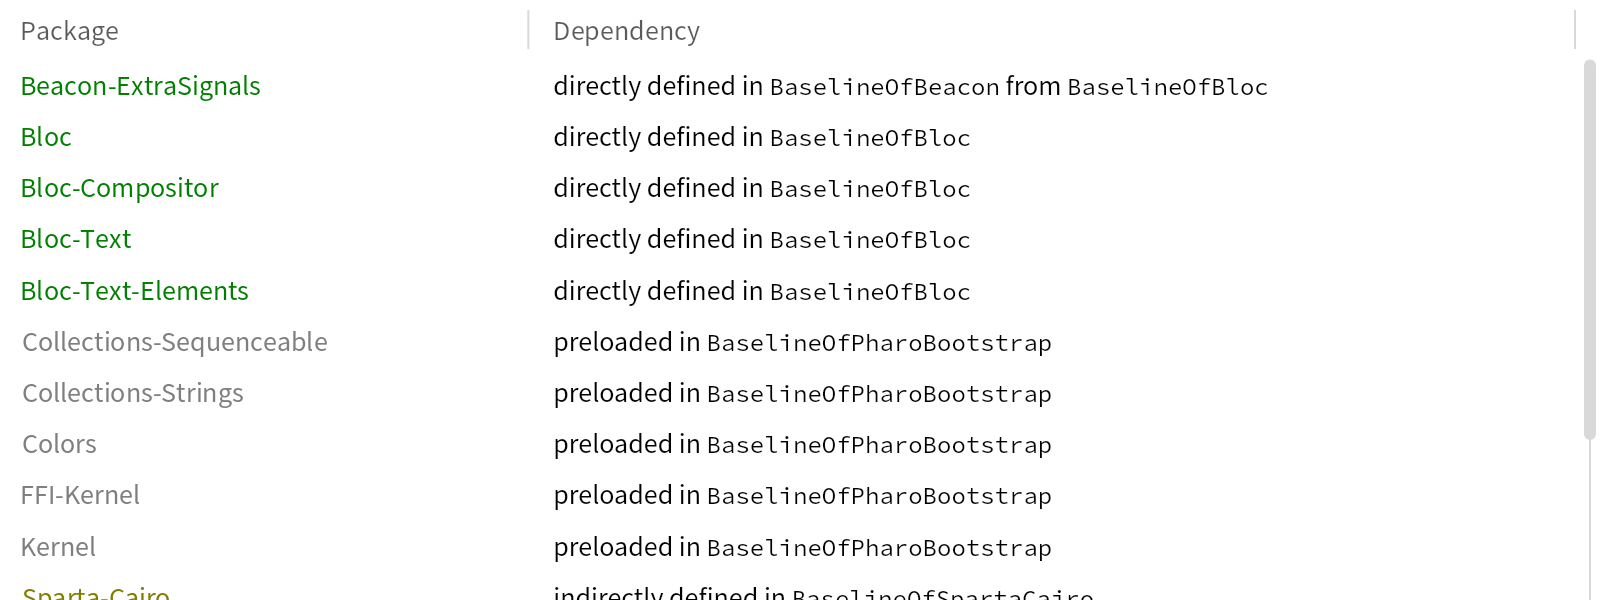
Sometimes, we have a data structure that is a tree, but no easy way to navigate it. For example, the code model of Pharo relies on package, package tag and class, but there is no uniform way to traverse them nicely. That's when we benefit from theGtNestedTreeBuilder
.
For example, here we get all classes that start with the Br prefix. We group those first by package and then by the package tag.
tree
	<gtExample>
	<return: #GtNestedTreeNode>
	^ GtNestedTreeBuilder new
		data: (Smalltalk allClassesAndTraits select: [ :c | c name beginsWith: 'Br' ]);
		groupBy: [ :aClass | aClass package ];
		groupBy: [ :aClass | aClass package tags detect: [ :e | e includesClass: aClass ] ];
		weight: [ :aClass | aClass methods size max: 1 ];
		build

The result is a nested tree node
that can be traversed uniformly.
So, now we can construct the treemap.
treemapWithLeavesSize
	<gtExample>
	<return: #GtNestedRectangleTreeMap>
	^ self treemap leavesSize: [ :aNode | aNode weight ]

The default shapes of a treemap can be fine, but sometimes we want to emphasize items. After all, it is a map.
In our case, let's aim to highlight the classes that define at least one custom inspector view with one color, and those that define examples with another color. To make this happen we specify GtNestedRectangleTreeMap>>#leafElement:
. The block receives an element that can be customized. You cannot create a new element because a treemap constrains the shape and size of the element.
treemapWithCustomLeafElement
	<gtExample>
	<return: #GtNestedRectangleTreeMap>
	^ self treemapWithLeavesSize
		leafElement: [ :anElement :aLeafContext |
			| isGtView isGtExample |
			isGtView := aLeafContext model item itOrItsSuperclassesDefineGTViews.
			isGtExample := aLeafContext model item methods
					anySatisfy: [ :aMethod | aMethod isGTExampleMethod ].
			anElement
				border: (BlBorder paint: (Color gray alpha: 0.5 / aLeafContext level) width: 1).
			anElement
				background: (isGtView
						ifTrue: [ Color blue alpha: 0.6 ]
						ifFalse: [ isGtExample
								ifTrue: [ Color green muchDarker alpha: 0.6 ]
								ifFalse: [ Color transparent ] ]) ]
Similarly, we can also customize the container element. For example, let's add a label with the package names.
treemapWithCustomContainerElement
	<gtExample>
	<return: #GtNestedRectangleTreeMap>
	^ self treemapWithCustomLeafElement
		containerElement: [ :anElement :aNodeContext |
			aNodeContext level = 2
				ifTrue: [ anElement
						addChild: (BrLabel new
								text: (aNodeContext model name name withoutPrefix: 'Brick-');
								aptitude: (BrGlamorousLabelAptitude new
										fontSize: 8;
										foreground: Color gray);
								constraintsDo: [ :c | c ignoreByLayout ]) ].
			anElement
				border: (BlBorder paint: (Color gray alpha: 0.7 / aNodeContext level) width: 1).
			anElement padding: (BlInsets all: 1) ]